Inserting and starting your Guardian™ Sensor 3 support
Select the topic that fits your support needs:
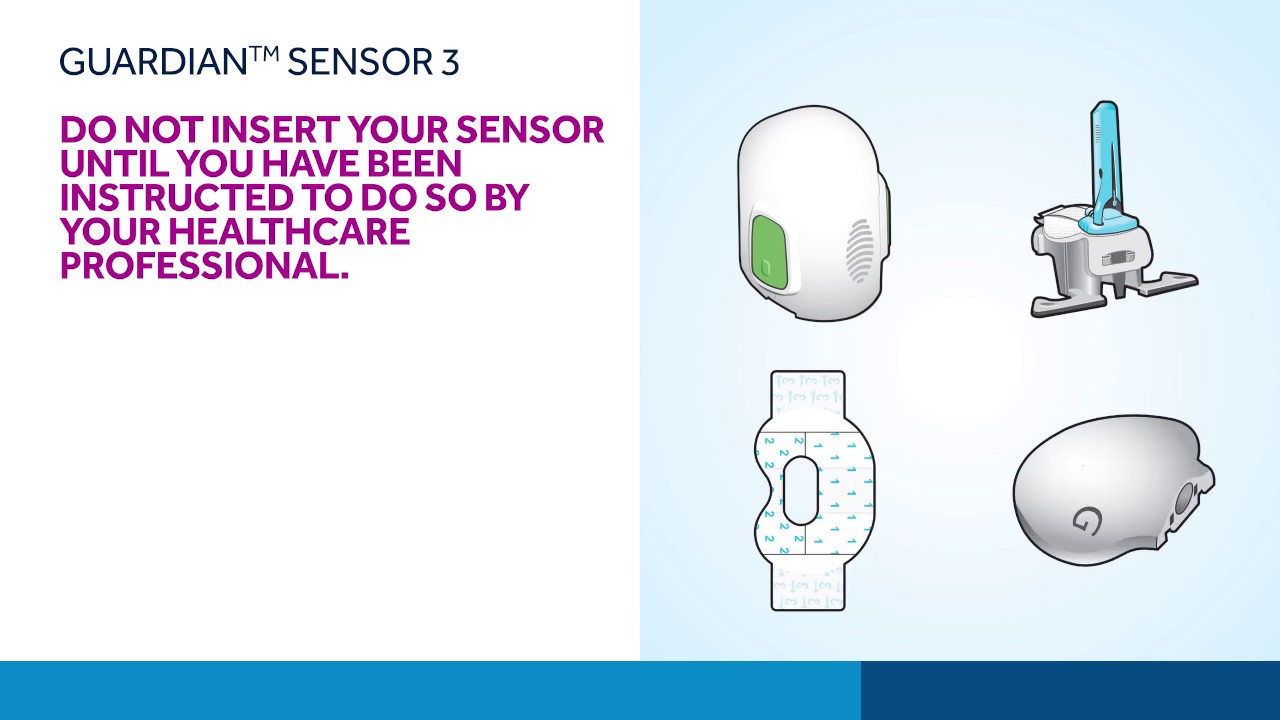
Gather your supplies
Before you insert your sensor, gather all of your supplies:
- One-press Serter is required in order to insert the sensor properly.
- Guardian™ Sensor 3 is individually packaged and comes attached to a plastic pedestal which is necessary for proper loading into the serter.
- Oval Tape is required to keep the sensor securely in place.
- The The Guardian™ Link 3 transmitter is connected after the sensor is inserted and is then covered with the Oval Tape.
Choosing insertion site
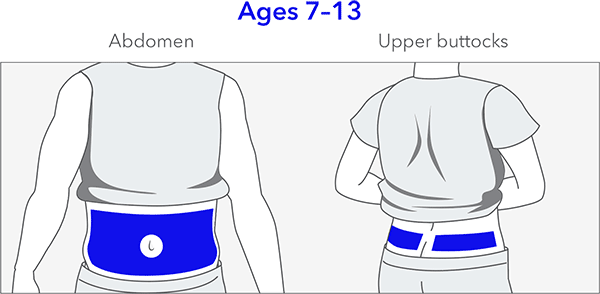
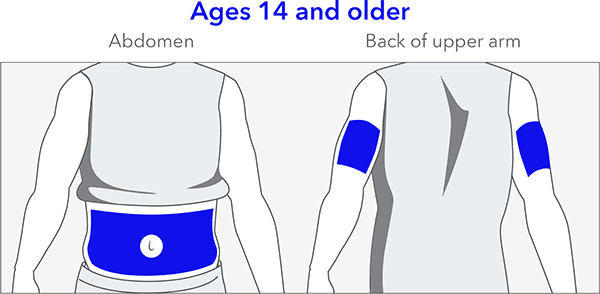
The Guardian™ Sensor 3 has been studied and is approved for use in the following sensor insertion site by persons of the following ages:
Other important factors to consider:
- Sensor should be at least 1 inch away from your insulin pump infusion site
- Sensor should be at least 1 inch away from any manual insulin injection site (syringe, pen)
For best sensor glucose performance, avoid these sites:
- Where clothing may rub or constrict
- Where your body naturally bends a great deal and may cause the sensor to pull out
- Where you have scarred or hardened tissue or stretch marks
- Where there is a great deal of motion or friction
To help provide the best experience when it comes to sensor life:
- Insert the Guardian™ Sensor 3 sensor in its approved insertion site (back of the upper arm, buttocks, or abdomen, depending on age).
- After insertion, when removing the needle from the sensor, make sure to hold the base of the sensor firmly in place.
- During taping, use the two pieces of Oval Tape that come with your sensor. The first piece of Oval Tape covers the base of the sensor and holds it in place as you wear it, while the second piece helps keeps the transmitter secure. Additional over tape can also help keep your sensor secure, especially if you’re active or live in a humid climate, so don’t be afraid to add extra tape on top if you need it!
Inserting your sensor
Want to see an abdomen insertion?
Watch this video showing the full process for an abdomen insertion.
Want to see an arm insertion?
Watch this video showing the full process for an arm insertion.

Starting your sensor
After the sensor is inserted and paired with the transmitter, the pump will display a Start New Sensor screen.
To start a new sensor:
Select Start New Sensor when it appears on the pump screen.

- The “Sensor warm up X:XX hr” message appears
Note: It may take up to five minutes for the “Sensor warm up X:XX hr” message to appear. The warm up period lasts two hours. Select OK.
The "Sensor warm up..." message appears on the Home screen until the sensor warm up is complete. After the warm up is complete, the pump begins receiving SG readings.
Disconnecting the transmitter and removing your sensor
When your sensor life is depleted you will need to remove your sensor to insert a new one.
- Carefully remove the tape and any additional adhesive from the transmitter.
- Remove the adhesive tab from the top of the transmitter.
- Hold the transmitter with one hand and pinch the flexible side arms of the sensor with the thumb and forefinger of your other hand.
- Gently pull the transmitter away from the sensor.
- Pull the sensor away from your body to remove it.
- Dispose of the sensor properly, in a sharps container.
- Place the transmitter on the charger.